Goofysでさくらのオブジェクトストレージのバケットをファイルシステムとしてマウントしてみよう

目次
はじめに
2021年4月にリリースしたさくらの「オブジェクトストレージ」は、ファイル操作手続きにAmazon S3プロトコルを採用しています。S3互換APIが搭載されているため、サポート対象外とはなりますが、S3に対応しているツールによる操作が可能です。
今回は、S3バケットをファイルシステムとしてマウントできる「Goofys」を利用して、「オブジェクトストレージ」内のバケットをマウントし、ファイル操作を行ってみました。
注意事項
さくらのクラウドのマニュアルにも記載していますが、さくらインターネットのオブジェクトストレージでは、サードパーティー製のツールを使用した場合の操作についてはサポート対象外です。利用の際はユーザの責任にて操作を行ってください。
参考ページ
Goofys GitHubと、以下ページを参考にさせていただきました。
動作環境
GitHubのInstallationを見ると、LinuxとMacの場合でのインストール方法の記載があります。今回はさくらのクラウド上にCentOSの仮想サーバを作成し、Linuxの手順でインストールしました。
- 仮想サーバ: CPU 2コア/メモリ 2GB/SSD 20GB
- 共有セグメント(インターネット)に接続
- OS: CentOS 7.9
[root@test-nfs ~]# cat /etc/centos-release
CentOS Linux release 7.9.2009 (Core)
[root@test-nfs ~]# uname -srvmpio
Linux 3.10.0-1160.6.1.el7.x86_64 #1 SMP Tue Nov 17 13:59:11 UTC 2020 x86_64 x86_64 x86_64 GNU/Linux
オブジェクトストレージの準備
テスト用にオブジェクトストレージのバケットを作成します。バケットの作成はAPIではできないので、コントロールパネルから行います。オブジェクトストレージのマニュアルを参照の上、作成します。今回は、テスト用の"test-grape"というバケットを作成しました。
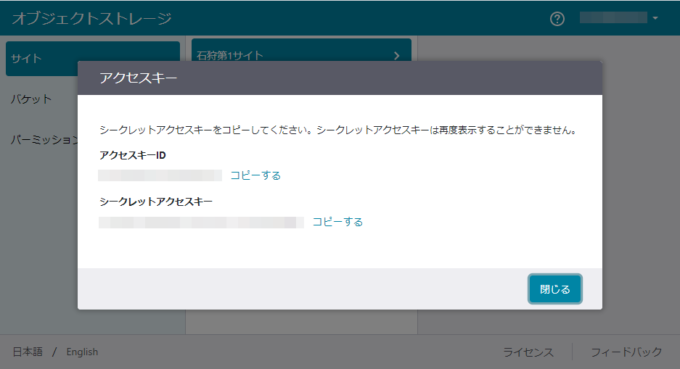
バケットを作成した後、マニュアルにおける「パーミッション設定によるアクセスキーの発行」に書かれている操作にてパーミッションを追加すると、バケットごとに設定したパーミッションで操作が可能となるアクセスキーとシークレットアクセスキーが表示されます。これをコピーします。(あとで使います)
必要なソフトウェアのインストール
Goofysのインストール
Linuxの場合はビルド済みパッケージがあるので、それをcurlでダウンロードし、「/usr/lcoal/bin」に配置します。あわせて、all usersに実行権を付与します。
[root@test-nfs ~]# curl -L https://github.com/kahing/goofys/releases/latest/download/goofys -o /usr/local/bin/goofys
[root@test-nfs ~]# chmod a+x /usr/local/bin/goofys
[root@test-nfs ~]# ls -l /usr/local/bin/goofys
-rwxr-xr-x 1 root root 23296633 May 26 14:16 /usr/local/bin/goofys
[root@test-nfs ~]# goofys --version
goofys version 0.24.0-45b8d78375af1b24604439d2e60c567654bcdf88
fuseのインストール
アンマウントするとき、およびOS起動時からのマウント(/etc/fstabへ記載してのマウント)時にfuseが必要となりますので、インストールします。
[root@test-nfs ~]# yum install -y fuse
(中略)
Installed:
  fuse.x86_64 0:2.9.2-11.el7

Complete!
[root@test-nfs ~]$ rpm -qa | grep fuse
fuse-2.9.2-11.el7.x86_64
[root@test-nfs ~]# fusermount --version
fusermount version: 2.9.2
AWS CLIのインストール
今回、オブジェクトの操作にAWS CLIを使用するので、こちらもインストールします。手順は AWSのドキュメントを参照します。
[root@test-nfs aws]# aws --version
aws-cli/2.2.22 Python/3.8.8 Linux/3.10.0-1160.6.1.el7.x86_64 exe/x86_64.centos.7 prompt/off
使用する際には初期設定が必要ですので、参照の上、設定しておきます。なお、初期設定においてaws configureコマンドを使用しますが、ここで「オブジェクトストレージの準備」で入手したアクセスキーとシークレットアクセスキーを使用します。
$ aws configure
AWS Access Key ID [None]: アクセスキーを入力
AWS Secret Access Key [None]: シークレットアクセスキーを入力
Default region name [None]: "jp-north-1" を入力
Default output format [None]: 何も入力せずにENTER
※ 今回は作成したサーバにてオブジェクトの操作を行うので、サーバにインストールしますが、インターネットに接続できる環境であればどこにインストールしてもよいです。ただし、さくらインターネット内部での通信に関してはGETリクエストを含め、オブジェクトストレージの転送量の課金対象外ですので、さくらのクラウドの仮想サーバ等から操作するのがお得です。
オブジェクトのアップロード
バケットにファイルをアップロードしてみます。先ほど作成したtest-grapeバケットに、awsコマンドを用いてオブジェクトをアップロードします。awsコマンドのオプションの説明は、さくらのクラウドのマニュアルをご覧ください。
(test-grapeバケットのオブジェクト一覧を表示。ただし現在はオブジェクトがないのでTotal Objectsが0になる)
[root@test-nfs ~]# aws --endpoint-url=https://s3.isk01.sakurastorage.jp s3 ls s3://test-grape/ --summarize --recursive
Total Objects: 0
Total Size: 0
('Hello'という文字列を、hello.txtというオブジェクトとして格納)
[root@test-nfs ~]# echo 'Hello!' | aws s3 cp - s3://test-grape/hello.txt --endpoint-url=https://s3.isk01.sakurastorage.jp
('Hello! in the sub dir'という文字列を、dirというディレクトリ下にhello2.txtというオブジェクトとして格納)
[root@test-nfs ~]# echo 'Hello! in the sub dir' | aws s3 cp - s3://test-grape/dir/hello2.txt --endpoint-url=https://s3.isk01.sakurastorage.jp
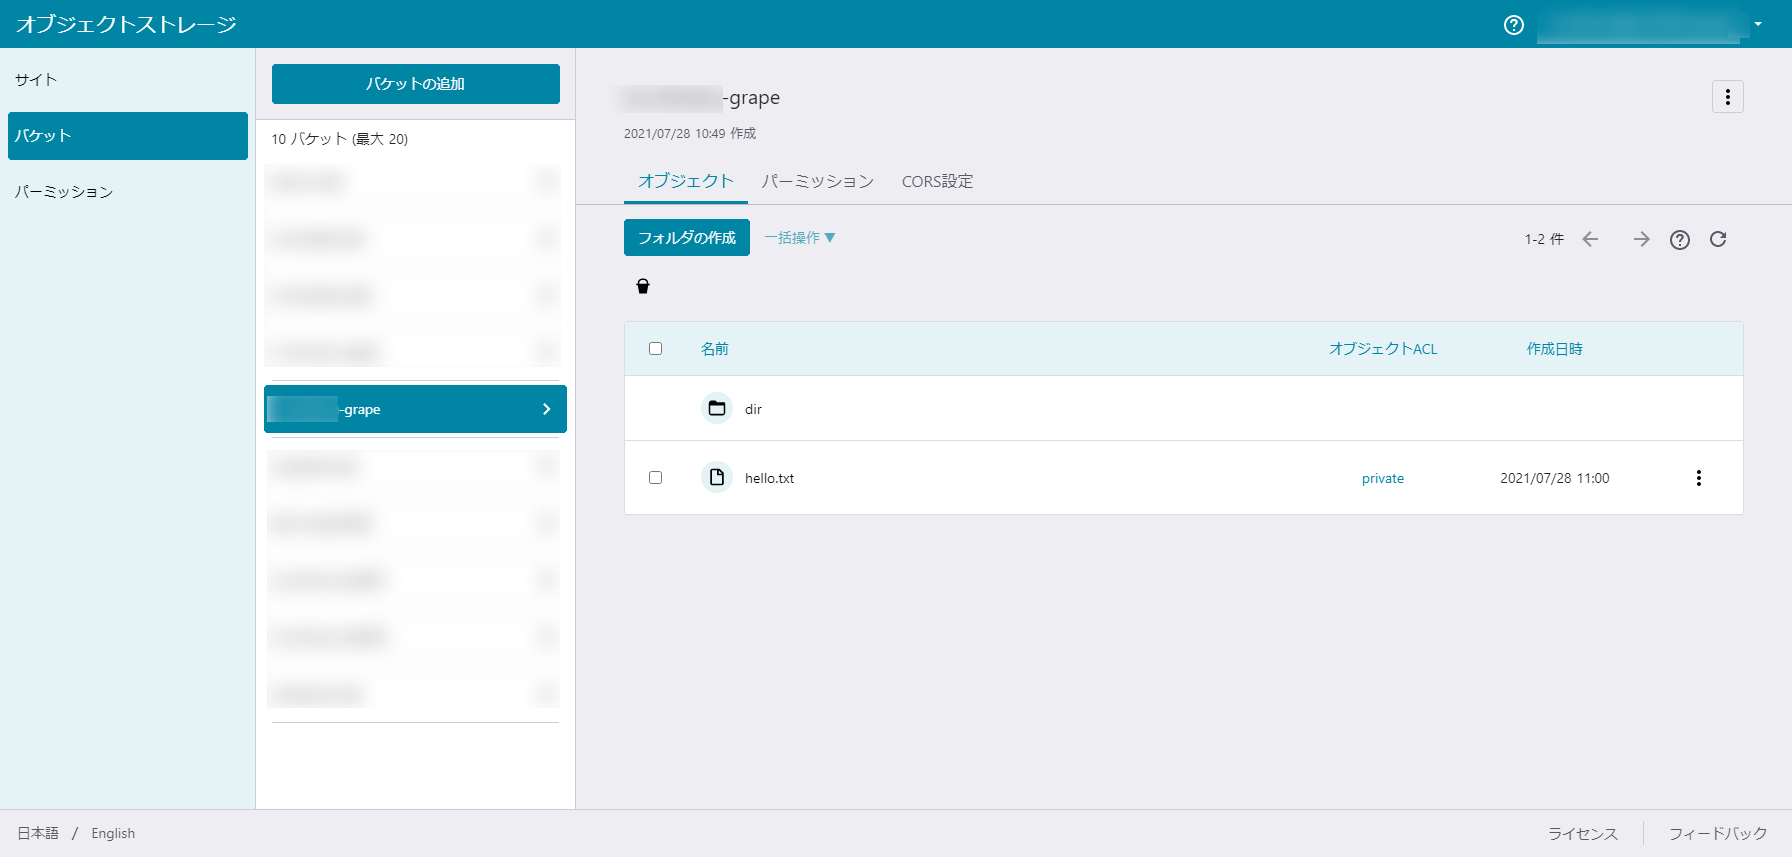
(test-grapeバケットのオブジェクト一覧をサブディレクトリ以下も含めて表示。2つのオブジェクトが確認できる)
[root@test-nfs ~]# aws --endpoint-url=https://s3.isk01.sakurastorage.jp s3 ls s3://test-grape/ --summarize --recursive
2021-07-28 11:01:33 22 dir/hello2.txt
2021-07-28 11:00:35 7 hello.txt
Total Objects: 2
Total Size: 29
(hello.txtの内容を表示)
[root@test-nfs ~]# aws s3 cp s3://test-grape/hello.txt - --endpoint-url=https://s3.isk01.sakurastorage.jp
Hello!
(hello2.txtの内容を表示)
[root@test-nfs ~]# aws s3 cp s3://test-grape/dir/hello2.txt - --endpoint-url=https://s3.isk01.sakurastorage.jp
Hello! in the sub dir
コントロールパネルにて確認
コントロールパネルから、先ほどバケットにアップロードしたオブジェクトがあることが確認できます。
※ コントロールパネルには、最新100件のオブジェクトが表示されます。
ファイルシステムとしてマウントする
それぞれ準備ができたので、実際にファイルシステムとしてtest-grapeをマウントしてみます。
マウントポイントの作成
マウント先となるディレクトリを / 配下に作成します。
[root@test-nfs test]# cd /
[root@test-nfs /]# mkdir grape-dir
[root@test-nfs /]# ls -l
total 64
lrwxrwxrwx.  1 root root     7 Dec 14  2020 bin -> usr/bin
dr-xr-xr-x.  5 root root  4096 Dec 14  2020 boot
drwxr-xr-x  19 root root  3040 Jul 27 18:49 dev
drwxr-xr-x. 94 root root  4096 Jul 27 18:52 etc
drwxr-xr-x   2 root root  4096 Jul 28 14:42 grape-dir
drwxr-xr-x.  3 root root  4096 Jul 27 18:50 home
lrwxrwxrwx.  1 root root     7 Dec 14  2020 lib -> usr/lib
lrwxrwxrwx.  1 root root     9 Dec 14  2020 lib64 -> usr/lib64
drwx------.  2 root root 16384 Dec 14  2020 lost+found
drwxr-xr-x.  2 root root  4096 Apr 11  2018 media
drwxr-xr-x.  2 root root  4096 Apr 11  2018 mnt
drwxr-xr-x.  2 root root  4096 Apr 11  2018 opt
dr-xr-xr-x  89 root root     0 Jul 27 18:48 proc
dr-xr-x---.  5 root root  4096 Jul 28 10:54 root
drwxr-xr-x  28 root root   740 Jul 27 18:52 run
lrwxrwxrwx.  1 root root     8 Dec 14  2020 sbin -> usr/sbin
drwxr-xr-x.  2 root root  4096 Apr 11  2018 srv
dr-xr-xr-x  13 root root     0 Jul 28 14:41 sys
drwxrwxrwt.  8 root root  4096 Jul 28 03:42 tmp
drwxr-xr-x. 13 root root  4096 Dec 14  2020 usr
drwxr-xr-x. 19 root root  4096 Jul 27 18:49 var
バケットをマウントする
test-grapeをマウントしてみましょう。マウント方法はUsageに記載の通りですが、エンドポイントをつける必要があります。
[root@test-nfs /]# goofys --endpoint=https://s3.isk01.sakurastorage.jp test-grape /grape-dir/
[root@test-nfs /]# df -h
Filesystem        Size  Used Avail Use% Mounted on
devtmpfs          984M     0  984M   0% /dev
tmpfs            1000M     0 1000M   0% /dev/shm
tmpfs            1000M  8.5M  991M   1% /run
tmpfs            1000M     0 1000M   0% /sys/fs/cgroup
/dev/vda3          16G  2.9G   12G  20% /
tmpfs             200M     0  200M   0% /run/user/1000
test-grape        1.0P     0  1.0P   0% /grape-dir
[root@test-nfs ~]# mount
sysfs on /sys type sysfs (rw,nosuid,nodev,noexec,relatime)
proc on /proc type proc (rw,nosuid,nodev,noexec,relatime)
devtmpfs on /dev type devtmpfs (rw,nosuid,size=1006776k,nr_inodes=251694,mode=755)
(中略)
debugfs on /sys/kernel/debug type debugfs (rw,relatime)
tmpfs on /run/user/1000 type tmpfs (rw,nosuid,nodev,relatime,size=204684k,mode=700,uid=1000,gid=1000)
test-grape on /grape-dir type fuse (rw,nosuid,nodev,relatime,user_id=0,group_id=0,default_permissions)
マウントされています!
オブジェクトの確認
先ほどアップロードしたオブジェクトをOSから確認してみます。
[root@test-nfs /]# cd grape-dir/
[root@test-nfs grape-dir]# ls -l
total 5
drwxr-xr-x 2 root root 4096 Jul 28 14:43 dir
-rw-r--r-- 1 root root    7 Jul 28 11:00 hello.txt
[root@test-nfs grape-dir]# ls -l dir/
total 1
-rw-r--r-- 1 root root 22 Jul 28 11:01 hello2.txt
[root@test-nfs grape-dir]# cat hello.txt
Hello!
[root@test-nfs grape-dir]# cat dir/hello2.txt
Hello! in the sub dir
ちゃんと見えました。
オブジェクトを作成してみる
次はOSからオブジェクトを作成(/grape-dirに格納)してみます。
[root@test-nfs grape-dir]# echo "Hello! in the virtual server." > hello3.txt
[root@test-nfs grape-dir]# ls -l
total 5
drwxr-xr-x 2 root root 4096 Jul 28 11:01 dir
-rw-r--r-- 1 root root   30 Jul 28 14:52 hello3.txt
-rw-r--r-- 1 root root    7 Jul 28 11:00 hello.txt
[root@test-nfs grape-dir]# cat hello3.txt
Hello! in the virtual server.
ディレクトリ内のファイルとして見えました。
次にAWS CLIで確認してみます。
[root@test-nfs grape-dir]# aws s3 cp s3://test-grape/hello3.txt - --endpoint-url=https://s3.isk01.sakurastorage.jp
Hello! in the virtual server.
先ほど入力したメッセージが見えています。
コントロールパネルでの表示
コントロールパネルでも確認してみます。
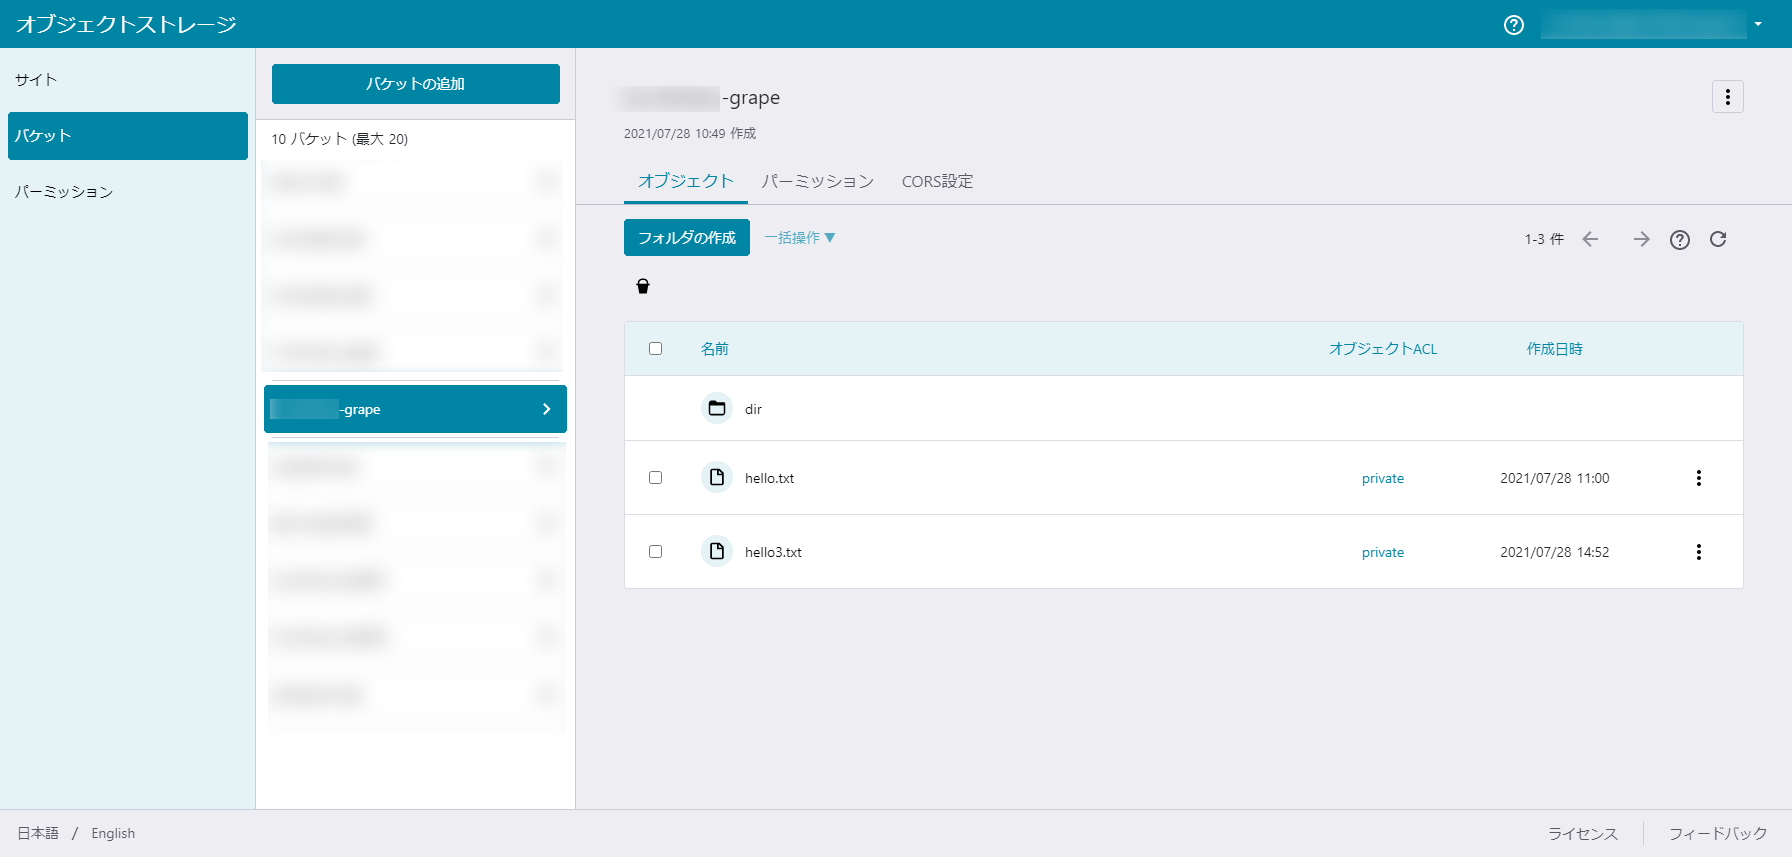
hello3.txtがあることがわかります。
アンマウント
アンマウントする際は、fuseのfusermountコマンドを使います。
[root@test-nfs ~]# df -h
Filesystem        Size  Used Avail Use% Mounted on
devtmpfs          984M     0  984M   0% /dev
tmpfs            1000M     0 1000M   0% /dev/shm
tmpfs            1000M  8.5M  991M   1% /run
tmpfs            1000M     0 1000M   0% /sys/fs/cgroup
/dev/vda3          16G  2.9G   12G  20% /
tmpfs             200M     0  200M   0% /run/user/1000
test-grape  1.0P     0  1.0P   0% /grape-dir
[root@test-nfs ~]# fusermount -u /grape-dir/
[root@test-nfs ~]# df -h
Filesystem      Size  Used Avail Use% Mounted on
devtmpfs        984M     0  984M   0% /dev
tmpfs          1000M     0 1000M   0% /dev/shm
tmpfs          1000M  8.5M  991M   1% /run
tmpfs          1000M     0 1000M   0% /sys/fs/cgroup
/dev/vda3        16G  2.9G   12G  20% /
tmpfs           200M     0  200M   0% /run/user/1000
アンマウントされました。
OS起動時からマウントさせる場合
/etc/fstabに追記する場合ですが、こちらもUsageに方法が載っています。こちらを参考に、エンドポイントを付け足して追記を行います。/etc/fstabの最後の行が追記した行です。
[root@test-nfs ~]# cat /etc/fstab
#
# /etc/fstab
# Created by anaconda on Mon Dec 14 04:55:29 2020
#
# Accessible filesystems, by reference, are maintained under '/dev/disk'
# See man pages fstab(5), findfs(8), mount(8) and/or blkid(8) for more info
#
UUID=dc83d69a-dcc2-40e5-86e3-f7c9c8d53d4c /                       ext4    defaults        1 1
UUID=1db1649d-fd8e-4059-a1ed-121864462f42 swap                    swap    defaults        0 0
goofys#test-grape /grape-dir        fuse     _netdev,allow_other,--file-mode=0666,--dir-mode=0777,--endpoint=https://s3.isk01.sakurastorage.jp    0       0
mountコマンドで/etc/fstabファイルを読み込ませ、マウントさせます。
[root@test-nfs ~]# mount /grape-dir/
[root@test-nfs ~]# df -h
Filesystem        Size  Used Avail Use% Mounted on
devtmpfs          984M     0  984M   0% /dev
tmpfs            1000M     0 1000M   0% /dev/shm
tmpfs            1000M  8.5M  991M   1% /run
tmpfs            1000M     0 1000M   0% /sys/fs/cgroup
/dev/vda3          16G  2.9G   12G  20% /
tmpfs             200M     0  200M   0% /run/user/1000
test-grape  1.0P     0  1.0P   0% /grape-dir
[root@test-nfs ~]# ls -l /grape-dir/
total 13
drwxrwxrwx 2 root root 4096 Jul 29 17:06 dir
-rw-rw-rw- 1 root root   30 Jul 28 14:52 hello3.txt
-rw-rw-rw- 1 root root    7 Jul 28 11:00 hello.txt
マウントされていることが確認できました。
権限について
goofysコマンドでマウントした際は権限の指定をしていなかったのでrootユーザしか操作できない状態でしたが、/etc/fstabに記載した際のオプションをつければディレクトリとファイルの権限を変更できます。
[root@test-nfs ~]# goofys --endpoint https://s3.isk01.sakurastorage.jp --file-mode=0666 --dir-mode=0777 -o allow_other test-grape /grape-dir/
他にも、gidやuidを指定するオプションもあります。GitHubでは見つけられなかったので、goofysコマンドのヘルプを引いてみました。このようなオプションが使えるようです。(「-h」のオプションも載っているのに、なぜか最初に「Error」のメッセージが表示されます。バグでしょうか……)
[root@test-nfs ~]$ goofys -h
Error: goofys takes exactly two arguments.

NAME:
   goofys - Mount an S3 bucket locally

USAGE:
   goofys [global options] bucket[:prefix] mountpoint

VERSION:
   0.24.0-45b8d78375af1b24604439d2e60c567654bcdf88

GLOBAL OPTIONS:
   -o value            Additional system-specific mount options. Be careful!
   --cache value       Directory to use for data cache. Requires catfs and `-o allow_other'. Can also pass in other catfs options (ex: --cache "--free:10%:$HOME/cache") (default: off)
   --dir-mode value    Permission bits for directories. (default: 0755) (default: 493)
   --file-mode value   Permission bits for files. (default: 0644) (default: 420)
   --uid value         UID owner of all inodes. (default: 1000)
   --gid value         GID owner of all inodes. (default: 1000)
   --endpoint value    The non-AWS endpoint to connect to. Possible values: http://127.0.0.1:8081/
   --profile value     Use a named profile from $HOME/.aws/credentials instead of "default"
   --use-content-type  Set Content-Type according to file extension and /etc/mime.types (default: off)
   --subdomain         Enable subdomain mode of S3

TUNING OPTIONS:
   --cheap                 Reduce S3 operation costs at the expense of some performance (default: off)
   --no-implicit-dir       Assume all directory objects ("dir/") exist (default: off)
   --stat-cache-ttl value  How long to cache StatObject results and inode attributes. (default: 1m0s)
   --type-cache-ttl value  How long to cache name -> file/dir mappings in directory inodes. (default: 1m0s)
   --http-timeout value    Set the timeout on HTTP requests to S3 (default: 30s)

AWS S3 OPTIONS:
   --region value         The region to connect to. Usually this is auto-detected. Possible values: us-east-1, us-west-1, us-west-2, eu-west-1, eu-central-1, ap-southeast-1, ap-southeast-2, ap-northeast-1, sa-east-1, cn-north-1 (default: "us-east-1")
   --requester-pays       Whether to allow access to requester-pays buckets (default: off)
   --storage-class value  The type of storage to use when writing objects. Possible values: REDUCED_REDUNDANCY, STANDARD, STANDARD_IA. (default: "STANDARD")
   --sse                  Enable basic server-side encryption at rest (SSE-S3) in S3 for all writes (default: off)
   --sse-kms key-id       Enable KMS encryption (SSE-KMS) for all writes using this particular KMS key-id. Leave blank to Use the account's CMK - customer master key (default: off)
   --sse-c value          Enable server-side encryption using this base64-encoded key (default: off)
   --acl value            The canned ACL to apply to the object. Possible values: private, public-read, public-read-write, authenticated-read, aws-exec-read, bucket-owner-read, bucket-owner-full-control (default: off)

MISC OPTIONS:
   --help, -h     Print this help text and exit successfully.
   --debug_fuse   Enable fuse-related debugging output.
   --debug_s3     Enable S3-related debugging output.
   -f             Run goofys in foreground.
   --version, -v  print the version
まとめ
Goofysでオブジェクトストレージをマウントして、ファイルシステムライクに利用することができました。権限の設定など少々手間がかかる部分もありますが、皆様もぜひ一度使ってみてください。