すべてのWebサイトの暗号化を目指すLet's Encryptを試す
インターネットの爆発的な広がりに合わせてセキュリティ上の問題に注目が集まるようになっています。2010年頃にはFiresheepが広まり、公衆無線LANなどにつないだPCの通信を簡単にモニタリングできてしまう行為が問題になりました。また、昨今のプライバシーに対する懸念から、多くのサイトではHTTPSをデフォルトにするようになっています。
そんな流れもあって現在開発が進められているのがLet's Encryptです。誰でも無料で使えるSSL/TLS証明書発行サービスとなっています。先日、ついにパブリックβになり、誰でもすぐに使えるようになりました。そこで今回はLet's Encryptを使ったサイトのSSL/TLS化手順について紹介します。
なお、執筆時点ではApacheについてはプラグインが提供されていますが、nginx向けは開発中とのことです。ただし手作業で行う分にはnginxでも利用できます。そこで今回はnginxサーバのSSL/TLS化を行いました。
環境について
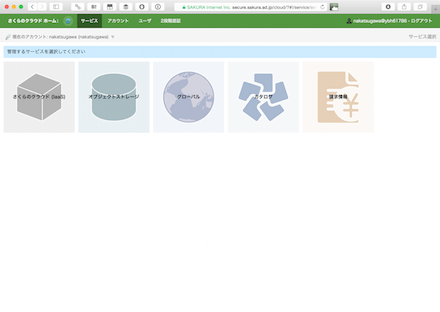
今回は sakura.moongift.jp というドメインを暗号化してみます。サーバはさくらのクラウドを使ってUbuntu 14.04 LTSを立てています。
クラウドのサーバが立ち上がったら、SSHでログインします。ドメイン名は解決できるようにしておきます。
ssh ubuntu@sakura.moongift.jp
Let's Encryptのインストール
インストールはとても簡単です。適当なディレクトリに移動して次のコマンドを打ちます。
git clone https://github.com/letsencrypt/letsencrypt
cd letsencrypt
これで letsencrypt-auto というコマンドが使えるようになります。ヘルプは次の通りです。virtualenvを使っています。
# ./letsencrypt-auto --help all
Updating letsencrypt and virtual environment dependencies......
.
Running with virtualenv: /root/.local/share/letsencrypt/bin/letsencrypt --help all
usage:
  letsencrypt [SUBCOMMAND] [options] [-d domain] [-d domain] ...

The Let's Encrypt agent can obtain and install HTTPS/TLS/SSL certificates.  By
default, it will attempt to use a webserver both for obtaining and installing
the cert. Major SUBCOMMANDS are:

  (default) run        Obtain & install a cert in your current webserver
  certonly             Obtain cert, but do not install it (aka "auth")
  install              Install a previously obtained cert in a server
  revoke               Revoke a previously obtained certificate
  rollback             Rollback server configuration changes made during install
  config_changes       Show changes made to server config during installation
  plugins              Display information about installed plugins

optional arguments:
  -h, --help            show this help message and exit
  -c CONFIG_FILE, --config CONFIG_FILE
                        config file path (default: None)
  -v, --verbose         This flag can be used multiple times to incrementally
                        increase the verbosity of output, e.g. -vvv. (default:
                        -3)
  -t, --text            Use the text output instead of the curses UI.
                        (default: False)
  --register-unsafely-without-email
                        Specifying this flag enables registering an account
                        with no email address. This is strongly discouraged,
                        because in the event of key loss or account compromise
                        you will irrevocably lose access to your account. You
                        will also be unable to receive notice about impending
                        expiration of revocation of your certificates. Updates
                        to the Subscriber Agreement will still affect you, and
                        will be effective 14 days after posting an update to
                        the web site. (default: False)
  -m EMAIL, --email EMAIL
                        Email used for registration and recovery contact.
                        (default: None)
  -d DOMAIN, --domains DOMAIN, --domain DOMAIN
                        Domain names to apply. For multiple domains you can
                        use multiple -d flags or enter a comma separated list
                        of domains as a parameter. (default: [])
  --duplicate           Allow getting a certificate that duplicates an
                        existing one (default: False)
  --user-agent USER_AGENT
                        Set a custom user agent string for the client. User
                        agent strings allow the CA to collect high level
                        statistics about success rates by OS and plugin. If
                        you wish to hide your server OS version from the Let's
                        Encrypt server, set this to "". (default: None)

automation:
  Arguments for automating execution & other tweaks

  --version             show program's version number and exit
  --renew-by-default    Select renewal by default when domains are a superset
                        of a previously attained cert (default: False)
  --agree-tos           Agree to the Let's Encrypt Subscriber Agreement
                        (default: False)
  --account ACCOUNT_ID  Account ID to use (default: None)

testing:
  The following flags are meant for testing purposes only! Do NOT change
  them, unless you really know what you're doing!

  --debug               Show tracebacks in case of errors, and allow
                        letsencrypt-auto execution on experimental platforms
                        (default: False)
  --no-verify-ssl       Disable SSL certificate verification. (default: False)
  --tls-sni-01-port TLS_SNI_01_PORT
                        Port number to perform tls-sni-01 challenge. Boulder
                        in testing mode defaults to 5001. (default: 443)
  --http-01-port HTTP01_PORT
                        Port used in the SimpleHttp challenge. (default: 80)

security:
  Security parameters & server settings

  --rsa-key-size N      Size of the RSA key. (default: 2048)
  --redirect            Automatically redirect all HTTP traffic to HTTPS for
                        the newly authenticated vhost. (default: None)
  --no-redirect         Do not automatically redirect all HTTP traffic to
                        HTTPS for the newly authenticated vhost. (default:
                        None)
  --hsts                Add the Strict-Transport-Security header to every HTTP
                        response. Forcing browser to use always use SSL for
                        the domain. Defends against SSL Stripping. (default:
                        False)
  --no-hsts             Do not automatically add the Strict-Transport-Security
                        header to every HTTP response. (default: False)
  --uir                 Add the "Content-Security-Policy: upgrade-insecure-
                        requests" header to every HTTP response. Forcing the
                        browser to use https:// for every http:// resource.
                        (default: None)
  --no-uir              Do not automatically set the "Content-Security-Policy:
                        upgrade-insecure-requests" header to every HTTP
                        response. (default: None)
  --strict-permissions  Require that all configuration files are owned by the
                        current user; only needed if your config is somewhere
                        unsafe like /tmp/ (default: False)

certonly:
  Options for modifying how a cert is obtained

  --csr CSR             Path to a Certificate Signing Request (CSR) in DER
                        format; note that the .csr file *must* contain a
                        Subject Alternative Name field for each domain you
                        want certified. (default: None)

install:
  Options for modifying how a cert is deployed

revoke:
  Options for revocation of certs

rollback:
  Options for reverting config changes

  --checkpoints N       Revert configuration N number of checkpoints.
                        (default: 1)

plugins:
  Plugin options

  --init                Initialize plugins. (default: False)
  --prepare             Initialize and prepare plugins. (default: False)
  --authenticators      Limit to authenticator plugins only. (default: None)
  --installers          Limit to installer plugins only. (default: None)

paths:
  Arguments changing execution paths & servers

  --cert-path CERT_PATH
                        Path to where cert is saved (with auth --csr),
                        installed from or revoked. (default: None)
  --key-path KEY_PATH   Path to private key for cert installation or
                        revocation (if account key is missing) (default: None)
  --fullchain-path FULLCHAIN_PATH
                        Accompanying path to a full certificate chain (cert
                        plus chain). (default: None)
  --chain-path CHAIN_PATH
                        Accompanying path to a certificate chain. (default:
                        None)
  --config-dir CONFIG_DIR
                        Configuration directory. (default: /etc/letsencrypt)
  --work-dir WORK_DIR   Working directory. (default: /var/lib/letsencrypt)
  --logs-dir LOGS_DIR   Logs directory. (default: /var/log/letsencrypt)
  --server SERVER       ACME Directory Resource URI. (default:
                        https://acme-v01.api.letsencrypt.org/directory)

plugins:
  Let's Encrypt client supports an extensible plugins architecture. See
  'letsencrypt plugins' for a list of all installed plugins and their names.
  You can force a particular plugin by setting options provided below.
  Further down this help message you will find plugin-specific options
  (prefixed by --{plugin_name}).

  -a AUTHENTICATOR, --authenticator AUTHENTICATOR
                        Authenticator plugin name. (default: None)
  -i INSTALLER, --installer INSTALLER
                        Installer plugin name (also used to find domains).
                        (default: None)
  --configurator CONFIGURATOR
                        Name of the plugin that is both an authenticator and
                        an installer. Should not be used together with
                        --authenticator or --installer. (default: None)
  --apache              Obtain and install certs using Apache (default: False)
  --nginx               Obtain and install certs using Nginx (default: False)
  --standalone          Obtain certs using a "standalone" webserver. (default:
                        False)
  --manual              Provide laborious manual instructions for obtaining a
                        cert (default: False)
  --webroot             Obtain certs by placing files in a webroot directory.
                        (default: False)

apache:
  Apache Web Server - Alpha

  --apache-ctl APACHE_CTL
                        Path to the 'apache2ctl' binary, used for
                        'configtest', retrieving the Apache2 version number,
                        and initialization parameters. (default: apache2ctl)
  --apache-enmod APACHE_ENMOD
                        Path to the Apache 'a2enmod' binary. (default:
                        a2enmod)
  --apache-dismod APACHE_DISMOD
                        Path to the Apache 'a2enmod' binary. (default:
                        a2dismod)
  --apache-le-vhost-ext APACHE_LE_VHOST_EXT
                        SSL vhost configuration extension. (default: -le-
                        ssl.conf)
  --apache-server-root APACHE_SERVER_ROOT
                        Apache server root directory. (default: /etc/apache2)

webroot:
  Webroot Authenticator

  -w WEBROOT_PATH, --webroot-path WEBROOT_PATH
                        public_html / webroot path. This can be specified
                        multiple times to handle different domains; each
                        domain will have the webroot path that preceded it.
                        For instance: `-w /var/www/example -d example.com -d
                        www.example.com -w /var/www/thing -d thing.net -d
                        m.thing.net` (default: None)

null:
  Null Installer

manual:
  Manually configure an HTTP server

  --manual-test-mode    Test mode. Executes the manual command in subprocess.
                        (default: False)
  --manual-public-ip-logging-ok
                        Automatically allows public IP logging. (default:
                        False)

standalone:
  Automatically use a temporary webserver

  --standalone-supported-challenges STANDALONE_SUPPORTED_CHALLENGES
                        Supported challenges, order preferences are randomly
                        chosen. (default: http-01,tls-sni-01)
使ってみる
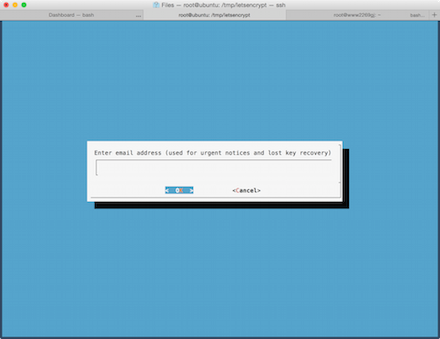
では実際に使ってみます。Webサーバのルートディレクトリとドメイン名を指定します。これは複数まとめて指定することもできます。初回の実行時にはメールアドレスが聞かれ、規約への同意が必要です。
Apacheなどはプラグインがありますので設定ファイルも含めて自動で作られるはずです。certonlyと指定しているので証明書だけが生成されます。
# ./letsencrypt-auto certonly --webroot -w /var/www/sakura.moongift.jp/ -d sakura.moongift.jp
Updating letsencrypt and virtual environment dependencies.......
Running with virtualenv: /root/.local/share/letsencrypt/bin/letsencrypt certonly --webroot -w /var/www/sakura.moongift.jp/ -d sakura.moongift.jp

IMPORTANT NOTES:
 - Congratulations! Your certificate and chain have been saved at
   /etc/letsencrypt/live/sakura.moongift.jp/fullchain.pem. Your cert
   will expire on 2016-03-04. To obtain a new version of the
   certificate in the future, simply run Let's Encrypt again.
 - If like Let's Encrypt, please consider supporting our work by:

   Donating to ISRG / Let's Encrypt:   https://letsencrypt.org/donate
   Donating to EFF:                    https://eff.org/donate-le
ここで注意点として、証明書の期限が90日と言うことです。90日経つ前に再度コマンドを実行しなければなりません。無料で作れるとあって、あまり長い期間を設定できると秘密鍵の漏洩であったり、ドメインが他の誰かに委譲していても使い続けられるような問題も考えられるからでしょう。とはいえ、コマンド一つでできますのでcronなどで定期的に実行しておけば安心です。
証明書のファイルは /etc/letsencrypt/live/ の下にドメインごとに作成されます。
# tree /etc/letsencrypt/live/sakura.moongift.jp/
/etc/letsencrypt/live/sakura.moongift.jp/
├── cert.pem -> ../../archive/sakura.moongift.jp/cert1.pem
├── chain.pem -> ../../archive/sakura.moongift.jp/chain1.pem
├── fullchain.pem -> ../../archive/sakura.moongift.jp/fullchain1.pem
└── privkey.pem -> ../../archive/sakura.moongift.jp/privkey1.pem
すべての証明書は /etc/letsencrypt/archive 以下に作成されて、最新の証明書がリンクされています。これで常に /etc/letsencrypt/live/ 以下の証明書を使うようにしておけば良いだけになります。
nginxで設定する
今回は静的なファイルのホストだけなので次のようになります。
$ cat /etc/nginx/sites-enabled/sakura.moongift.jp
server {
    listen 80;
    server_name sakura.moongift.jp;
    root /var/www/sakura.moongift.jp;
}

server {
    listen 443;
    server_name sakura.moongift.jp;
    ssl on;
    ssl_certificate     /etc/letsencrypt/live/sakura.moongift.jp/fullchain.pem;
    ssl_certificate_key /etc/letsencrypt/live/sakura.moongift.jp/privkey.pem;
    root /var/www/sakura.moongift.jp;
}
nginxの場合は fullchain.pem と privkey.pem を使います。Apacheの場合は以下のように設定を行います。
- SSLCertificateKeyFile(privkey.pem)
- SSLCertificateFile(cert.pem)
- SSLCertificateChainFile(chain.pem)
fullchain.pem というファイルは cert.pem と chain.pem が一緒になったファイルです。
設定について
暗号化強度やWebルートの設定などはcli.iniというファイルで指定可能です。 /etc/letsencrypt/cli.ini というファイルか、~/.config/letsencrypt/cli.ini が使われます(XDG_CONFIG_HOMEにて指定も可能)。
# This is an example of the kind of things you can do in a configuration file.
# All flags used by the client can be configured here. Run Let's Encrypt with
# "--help" to learn more about the available options.

# Use a 4096 bit RSA key instead of 2048
rsa-key-size = 4096

# Always use the staging/testing server
server = https://acme-staging.api.letsencrypt.org/directory

# Uncomment and update to register with the specified e-mail address
# email = foo@example.com

# Uncomment to use a text interface instead of ncurses
# text = True

# Uncomment to use the standalone authenticator on port 443
# authenticator = standalone
# standalone-supported-challenges = tls-sni-01

# Uncomment to use the webroot authenticator. Replace webroot-path with the
# path to the public_html / webroot folder being served by your web server.
# authenticator = webroot
# webroot-path = /usr/share/nginx/html
Webブラウザからアクセスする
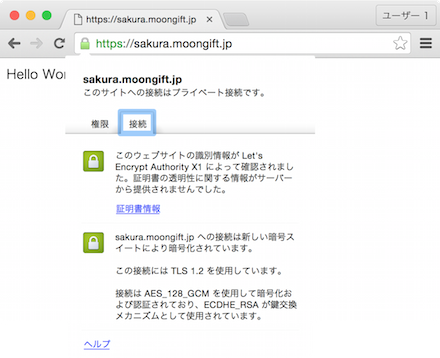
ここまでの設定が終われば、後はWebブラウザからアクセスします。確かに鍵付きアイコンで表示されます。ValidなSSL/TLSとなっています。
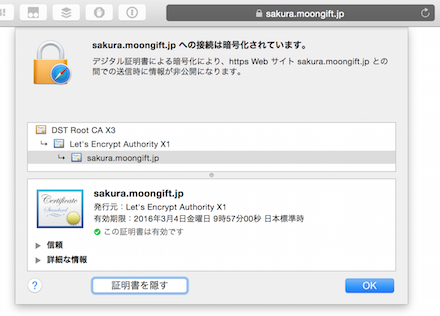
証明書の詳細です。確かに期限は90日間となっています。
Let's Encrypt について
Let's Encryptは前述の通り、すべてのWebサイトをSSL/TLS化することを目的とし、暗号化を当たり前のこととして普及しようとしています。SSL/TLS化することで、少なくともWebブラウザとサーバ間においては安全な通信が可能となるでしょう。もちろんWebサイト自身の脆弱性やPC本体やWebブラウザのバグがカバーされる訳ではありませんが、安心を与えるための仕組みとしては重要です。
現在のSSL/TLS証明書は暗号化目的と同時に存在証明を兼ねています。大手のSSL/TLS証明書を使っていると、その企業名などがアドレスバーに出るのはその類です。Let's Encryptではそういった機能はなく、純粋に暗号化のみを行っています。個人であればLet's Encryptで十分かも知れませんが、企業ユースとなると90日間の有効期限を含めて運用が大変になってしまうでしょう。
SSL証明書には幾つかの種類がありますが、Let's Encryptが対応しているのはドメインの保有を証明するDV証明書のみとなります。そして、ACMEプロトコルという仕組み(まだ策定中)によってドメインの保有を確認しながら証明書を生成するところまで自動的に行っています。これでSSL/TLS証明書を取得するという敷居が格段に下がります。
なお、SHA-2証明書になりますので一部のフューチャーフォンに対応していなかったり、古いAndroidにおいて警告が表示される場合があるようです。その点もサービス提供先によっては注意が必要でしょう。デモページが用意されていますので、このページが表示できている場合は問題ありません。
ぜひお試しください!