HAクラスタをDRBDとPacemakerで作ってみよう [Pacemaker編]

さくらインターネット 技術本部の山野です。
サーバは故障したり障害を起こしたりして停止するものですが、ダウンタイムをより短くしなければならないものがあります。 そこで、ストレージレプリケーションソフトウェアDRBDと、HAクラスタ管理ツールPacemakerを用いて、1台のサーバが故障しても動き続けるアクティブ/スタンバイ形式のZabbix監視サーバの作成方法をご紹介します。
前回の記事では、2台のサーバを用意し、ストレージレプリケーションソフトウェアDRBDの設定を行いました。今回の記事はそれに引き続き、Pacemakerを導入して、サーバ故障などの際に自動的に切り替えが行われるHAクラスタを構築します。 まずはLAMP環境とZabbixをセットアップしてから、Pacemakerのインストールと設定を行い、最後にフェイルオーバーを試してみたいと思います。
前回と同様に、特に記載しない限りは、2ホストとも同じ作業を行う必要があります。特定のホストでのみ行う作業は、プロンプトにホスト名を記載します。
LAMP環境とZabbixの構築
はじめに、LAMP環境とZabbixサーバの構築を行います。主な作業項目は以下の通りです。
- httpd(Apache)、MariaDB、PHP、Zabbixなど、必要なパッケージのインストール
- DRBDブロックデバイスのマウント
- MariaDBの起動とZabbix用データベースを作成
- httpdの設定と起動
- Zabbixサーバの設定と起動、セットアップウィザードの実行
それでは作業手順を説明します。なお、一部の作業はha-aのみで行うことに注意してください。また、Zabbixサーバの構築についてはこちらの記事も参考にしてください。まず、必要になるパッケージをインストールします。
# yum install mariadb mariadb-server
# yum install httpd php php-mysql php-mbstring
# rpm -i https://repo.zabbix.com/zabbix/4.0/rhel/7/x86_64/zabbix-release-4.0-1.el7.noarch.rpm
# yum install zabbix-server-mysql zabbix-web-mysql zabbix-web-japanese zabbix-agent
前回の記事でDRBDブロックデバイスをha-a:/tmpにマウントしたままの場合は、アンマウントしておいてください。
// /tmpなどにマウントしたままの場合
[root@ha-a ~]# umount /dev/drbd1
DRBDブロックデバイスをMariaDBで利用するので、ha-a:/var/lib/mysql にマウントします。
[root@ha-a ~]# drbdadm primary r0   <- 既にPrimaryの場合は不要
[root@ha-a ~]# mount /dev/drbd1 /var/lib/mysql
[root@ha-a ~]# chown mysql:mysql /var/lib/mysql
ha-aにてMariaDBを起動し、Zabbix用のデータベースを作成します。
[root@ha-a ~]# systemctl start mariadb
[root@ha-a ~]# mysql_secure_installation
[root@ha-a ~]# echo "create database zabbix default character set utf8;" | mysql -u root -p
[root@ha-a ~]# echo "grant all privileges on zabbix.* to zabbix@localhost identified by 'yourpassword'" | mysql -u root -p
zabbix-serverとPHPの設定を編集しておきます。ha-aとha-bの両ホストで編集しておく必要があります。
# vi /etc/zabbix/zabbix_server.conf
DBHost=localhost
DBName=zabbix
DBUser=zabbix
DBPassword=yourpassword

# vi /etc/httpd/conf.d/zabbix.conf
php_value date.timezone Asia/Tokyo
ha-aにてZabbixのデータベースの初期化を行い、zabbix-serverとhttpdを起動します。
[root@ha-a ~]# zcat /usr/share/doc/zabbix-server-mysql-*/create.sql.gz | mysql -uzabbix -p zabbix
[root@ha-a ~]# systemctl start httpd
[root@ha-a ~]# systemctl start zabbix-server
http://ha-aのIPアドレス/zabbix/ へアクセスし、Zabbixのセットアップを進めてください。(セットアップ手順についてはこちらの記事をご覧ください)
セットアップ完了後にウィザードによって作成された /etc/zabbix/web/zabbix.conf.php は、ha-bにもコピーしておく必要があります。
[root@ha-a ~]# scp /etc/zabbix/web/zabbix.conf.php ha-b:/etc/zabbix/web/zabbix.conf.php
Zabbixのダッシュボードが表示されるところまで動作を確認したら、今後はPacemakerで制御するので、ha-aで一時的に起動していたリソースを停止します。
[root@ha-a ~]# systemctl stop httpd
[root@ha-a ~]# systemctl stop zabbix-server
[root@ha-a ~]# systemctl stop mariadb
[root@ha-a ~]# umount /var/lib/mysql
[root@ha-a ~]# drbdadm secondary r0
[root@ha-a ~]# drbdadm status r0
r0 role:Secondary
  disk:UpToDate
  ha-b.example.com role:Secondary
    peer-disk:UpToDate

[root@ha-a ~]#
DRBDの起動及び停止もPacemakerで制御するので、ha-aとha-bでDRBDを停止しておきます。
# systemctl stop drbd
Pacemaker, Corosync
アクティブなホストが障害を起こした場合、スタンバイのホストが検知してデーモンの立ち上げや仮想IPアドレスの設定を行いアクティブになる必要がありますが、これを自動的に制御するのがPacemakerとCorosyncです。PacemakerとCorosyncは協調して動作し、ホスト内のデーモンや仮想IPアドレスといったリソースの監視や制御をPacemakerが、ホスト同士の通信をCorosyncが担当します。
インストールとクラスタの構築
まずは必要なパッケージをインストールします。パッケージをインストールすると作成されるhaclusterユーザはあとで使いますので、ha-aとha-bで同一のパスワードを設定します。その後、Pacemaker/Corosyncの設定システムpcsを起動します。
# yum install pacemaker pcs corosync
# passwd hacluster  <- 同一のパスワードを設定しておきます。
# systemctl start pcsd
# systemctl enable pcsd
ha-aとha-bを用いてクラスタをセットアップします。今回は、haという名前のクラスタをha-aとha-bで構成します。これらの作業は、クラスタを構成するうち1つのホストで実施します。
// ha-aとha-bで認証を行う。
[root@ha-a ~]# pcs cluster auth ha-a-local.example.com ha-b-local.example.com
Username: hacluster
Password:             <- 先ほど設定した共通のパスワードを入力
ha-b-local.example.com: Authorized
ha-a-local.example.com: Authorized

// ha-aとha-bを用いてhaというクラスタをセットアップする。
[root@ha-a ~]# pcs cluster setup --name ha ha-a-local.example.com ha-b-local.example.com
Destroying cluster on nodes: ha-a-local.example.com, ha-b-local.example.com...
ha-a-local.example.com: Stopping Cluster (pacemaker)...
ha-b-local.example.com: Stopping Cluster (pacemaker)...
ha-a-local.example.com: Successfully destroyed cluster
ha-b-local.example.com: Successfully destroyed cluster

Sending 'pacemaker_remote authkey' to 'ha-a-local.example.com', 'ha-b-local.example.com'
ha-b-local.example.com: successful distribution of the file 'pacemaker_remote authkey'
ha-a-local.example.com: successful distribution of the file 'pacemaker_remote authkey'
Sending cluster config files to the nodes...
ha-a-local.example.com: Succeeded
ha-b-local.example.com: Succeeded

Synchronizing pcsd certificates on nodes ha-a-local.example.com, ha-b-local.example.com...
ha-b-local.example.com: Success
ha-a-local.example.com: Success
Restarting pcsd on the nodes in order to reload the certificates...
ha-b-local.example.com: Success
ha-a-local.example.com: Success

// start及びenebleする。
[root@ha-a ~]# pcs cluster start --all
ha-a-local.example.com: Starting Cluster...
ha-b-local.example.com: Starting Cluster...

[root@ha-a ~]# pcs cluster enable --all
ha-a-local.example.com: Cluster Enabled
ha-b-local.example.com: Cluster Enabled
STONITHという機能が標準で有効になっていますが、正しく設定を行っていないためにエラーが表示されるので、機能を無効にしておきます。また、次のコマンドで状態を確認できるので、ha-aとha-bによって構成されていることを確認しておきます。
[root@ha-a ~]# pcs property set stonith-enabled=false
[root@ha-a ~]# pcs status corosync

Membership information
----------------------
    Nodeid      Votes Name
         1          1 ha-a-local.example.com (local)
         2          1 ha-b-local.example.com
[root@ha-a ~]# pcs status
Cluster name: ha
Stack: corosync
Current DC: ha-b-local.example.com (version 1.1.18-11.el7_5.3-2b07d5c5a9) - partition with quorum
Last updated: Tue Oct  2 10:45:54 2018
Last change: Tue Oct  2 10:45:32 2018 by hacluster via crmd on ha-b-local.example.com

2 nodes configured       <- 2ノードで構成されている
0 resources configured   <- リソースはまだ未設定なので0

Online: [ ha-a-local.example.com ha-b-local.example.com ]   <- ha-aとha-bがONLINE

No resources


Daemon Status:          <- 関連サービスはactiveでenabled
  corosync: active/enabled
  pacemaker: active/enabled
  pcsd: active/enabled
[root@ha-a ~]#
Pacemakerで管理するリソースの登録
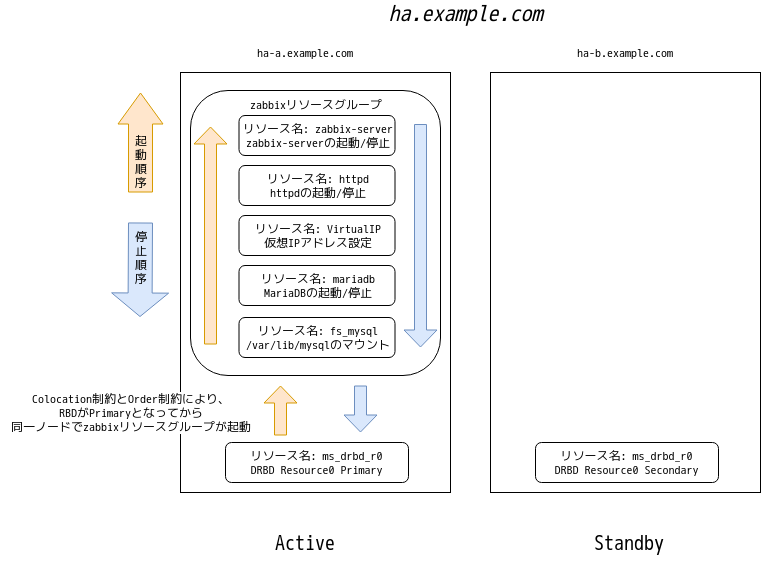
続いて、Pacemakerで管理するリソースと、リソースに対する制約を登録します。今回は仮想IPアドレスやZabbix, MariaDBなどのリソースを登録しますが、次の条件を満たす必要があります。
- DRBDはha-a及びha-bの両ノードで動作し、どちらか1ノードでのみPrimaryロールとなる。
- DRBDがPrimaryロールのノードで、DRBDブロックデバイスのマウントを実施する。
- DRBD以外の全てのリソースは、DRBDがPrimaryロールのサーバで起動する。
- DRBDのロール変更やデバイスのマウント、zabbix-serverの起動などには順序がある。
これらの条件を満たすために、通常のPrimitiveリソース以外に、Master/Slaveリソースとリソースグループ及び、colocation制約とorder制約を用います。
Primitiveリソースはクラスタ内の1ノードで起動し、障害発生時は別のノードで起動します。今回の場合は仮想IPアドレスやzabbix-server等がこのリソースタイプになります。これに対しMaster/Slaveリソースは、複数のノードで起動しMasterとSlaveという概念を持ちます。startとstopに加えてpromoteとdemoteという操作が有り、これによりMasterへの昇格とSlaveへの降格が行われます。今回の場合はDRBDがこのリソースタイプとなり、リソースのMaster/Slaveは、DRBDのPrimary/Secondaryロールに対応します。
colocation制約は複数のリソースを同一ノードで起動させる制約として用い、order制約はリソース同士のアクション(起動及び停止など)の順序を指定します。リソースグループは上記の制約を合わせたようなもので、同じリソースグループに指定したリソースは同一ノードで起動され、起動順序も指定されます。
下記のコマンドを用いて、実際にリソースと制約を設定します。仮想IPアドレスやサブネットマスクは、皆さんの環境に合わせて置き換えてください。
// リソース名: drbd_r0
// DRBDのResource0をリソースとして登録します。
[root@ha-a ~]# pcs resource create drbd_r0 ocf:linbit:drbd drbd_resource=r0 op monitor interval=10s role=Master monitor interval=30s role=Slave

// リソース名: ms_drbd_r0
// リソースdrbd_r0をMaster/Slave形式とし、2ノードで立ち上げ、うち1ノードがMasterとなるように指定します。
// 結果として、ha-aとha-bでDRBDが起動し、どちらか1ノードでのみPrimaryロールとなります。
[root@ha-a ~]# pcs resource master ms_drbd_r0 drbd_r0 master-max=1 master-node-max=1 clone-max=2 clone-node-max=1 notify=true

// リソース名: fs_mysql
// DRBDブロックデバイス /dev/drbd1 を /var/lib/mysql へマウントします。
// また、zabbixリソースグループを作成し所属させます。
// 仮想IPアドレスやzabbix-serverのリソースを、このzabbixリソースグループに所属させることで、同一ノードで順番に起動するようにします。
[root@ha-a ~]# pcs resource create fs_mysql ocf:heartbeat:Filesystem device=/dev/drbd1 directory=/var/lib/mysql fstype=ext4 --group zabbix

// colocation制約
// リソースfs_mysqlはDRBDブロックデバイスをマウントしますので、リソースms_drbd_r0とzabbixリソースグループが同一ノードで起動する制約を付加します。
// あわせて、リソースms_drbd_r0がMaster(= DRBDがPrimaryロール)である制約を付加します。
[root@ha-a ~]# pcs constraint colocation add zabbix ms_drbd_r0 INFINITY with-rsc-role=Master

// リソースfs_mysqlはDRBDブロックデバイスをマウントしますので、リソースms_drbd_r0によってpromoteしてから(DRBDがPrimaryロールとなってから)zabbixリソースグループを起動する制約を付加します。
// 合わせて、今回の登録手順ではこの時点でエラーが発生し正常に稼働していないため、これをクリアしておきます。
[root@ha-a ~]# pcs constraint order promote ms_drbd_r0 then start zabbix
[root@ha-a ~]# pcs resource cleanup

// リソース名: mariadb
// MariaDBをリソースとして登録します。zabbixリソースグループに所属させます。
[root@ha-a ~]# pcs resource create mariadb systemd:mariadb --group zabbix

// リソース名: VirtualIP
// 仮想IPアドレスを設定します。仮想IPアドレス(yourVirtualIP)とサブネット(yourNetmaskCIDR。例:28)は自身の環境に置き換えてください。
// zabbixリソースグループに所属させます。
[root@ha-a ~]# pcs resource create VirtualIP ocf:heartbeat:IPaddr2 ip=yourVirtualIP cidr_netmask=yourNetmaskCIDR --group zabbix

// リソース名: httpd
// httpdをリソースとして登録します。zabbixリソースグループに所属させます。
[root@ha-a ~]# pcs resource create httpd systemd:httpd --group zabbix

// リソース名: zabbix-server
// zabbix-serverをリソースとして登録します。zabbixリソースグループに所属させます。
[root@ha-a ~]# pcs resource create zabbix-server systemd:zabbix-server --group zabbix
上記のコマンドを入力すると、仮想IPアドレスを用いてZabbixのWebUIへのアクセスが行え、zabbix-serverも起動していると思います。実際にウェブブラウザで仮想IPアドレスにアクセスし、WebUIを確認したり、pcs status コマンドで正常に動作していることを確認したりしてください。
Pacemakerのリソース
[root@ha-a ~]# pcs status
Cluster name: ha
Stack: corosync
Current DC: ha-a-local.example.com (version 1.1.18-11.el7_5.3-2b07d5c5a9) - partition with quorum
Last updated: Wed Oct  3 11:54:25 2018
Last change: Wed Oct  3 11:54:11 2018 by root via cibadmin on ha-a-local.example.com

2 nodes configured
7 resources configured

Online: [ ha-a-local.example.com ha-b-local.example.com ]  <- 2ノードがONLINEとなっている。

Full list of resources:

 Master/Slave Set: ms_drbd_r0 [drbd_r0]   <- DRBDがha-aでMaster, ha-bでSlaveとなっている。
     Masters: [ ha-a-local.example.com ]
     Slaves: [ ha-b-local.example.com ]
 Resource Group: zabbix                   <- zabbixリソースグループに登録順にリソースが登録されている。
     fs_mysql   (ocf::heartbeat:Filesystem):    Started ha-a-local.example.com
     mariadb    (systemd:mariadb):      Started ha-a-local.example.com
     VirtualIP  (ocf::heartbeat:IPaddr2):       Started ha-a-local.example.com
     httpd      (systemd:httpd):        Started ha-a-local.example.com
     zabbix-server      (systemd:zabbix-server):        Started ha-a-local.example.com

Daemon Status:                           <- 各デーモンはactiveで自動起動がenabledとなっている。
  corosync: active/enabled
  pacemaker: active/enabled
  pcsd: active/enabled
[root@ha-a ~]# drbdadm status r0         <- 想定通りDRBDが起動し、ローカルホスト(ha-a)がPrimary、対向ホスト(ha-b)がSecondaryとなっている。
r0 role:Primary
  disk:UpToDate
  ha-b.example.com role:Secondary
    peer-disk:UpToDate

[root@ha-a ~]#
フェイルオーバー
実際にフェイルオーバーが動作するか確認してみます。今回は、手動で意図的に切り替える方法と、ホストの停止を想定して、クラウドのコントロールパネルから強制停止する方法を試してみます。また、プロセスが停止した場合の動作も確認します。
手動でのフェイルオーバー
DRBDの初回同期が既に完了していることを確認の上、次のコマンドでアクティブなサーバをスタンバイに変更します。今回は、ha-aがアクティブの前提で、ha-aをスタンバイ状態に変更してみます。もしha-bがアクティブの場合は、ha-bに置き換えてください。
// ha-aをスタンバイにする。
[root@ha-a ~]# pcs cluster standby ha-a-local.example.com
[root@ha-a ~]# pcs status
Cluster name: ha
Stack: corosync
Current DC: ha-a-local.example.com (version 1.1.18-11.el7_5.3-2b07d5c5a9) - partition with quorum
Last updated: Wed Oct  3 12:01:14 2018
Last change: Wed Oct  3 12:00:33 2018 by root via cibadmin on ha-a-local.example.com

2 nodes configured
7 resources configured

Node ha-a-local.example.com: standby   <- ha-aがstandbyとなる。
Online: [ ha-b-local.example.com ]

Full list of resources:

 Master/Slave Set: ms_drbd_r0 [drbd_r0]
     Masters: [ ha-b-local.example.com ]
     Stopped: [ ha-a-local.example.com ]
 Resource Group: zabbix                <- 各リソースがha-bで起動する。
     fs_mysql   (ocf::heartbeat:Filesystem):    Started ha-b-local.example.com
     mariadb    (systemd:mariadb):      Started ha-b-local.example.com
     VirtualIP  (ocf::heartbeat:IPaddr2):       Started ha-b-local.example.com
     httpd      (systemd:httpd):        Started ha-b-local.example.com
     zabbix-server      (systemd:zabbix-server):        Started ha-b-local.example.com

Daemon Status:
  corosync: active/enabled
  pacemaker: active/enabled
  pcsd: active/enabled
[root@ha-a ~]#
なおこのとき、ha-aでDRBDは動作していないため、standbyから戻した時にDRBDの同期が発生します。
[root@ha-b ~]# drbdadm status r0
r0 role:Primary
  disk:UpToDate
  ha-a.example.com connection:Connecting

[root@ha-b ~]#
Zabbix等が変わりなく動作していることが確認できたら、ha-aをスタンバイから戻しておきます。
[root@ha-a ~]# pcs cluster unstandby ha-a-local.example.com
ホストの停止によるフェイルオーバー
ホストの停止によるフェイルオーバーをテストするために、まずクラウドのコントロールパネルからha-bを強制停止します。その後、pcs statusにて各種リソースの起動ホストがha-aに切り替わっていることと、Zabbix等の動作の確認を行います。
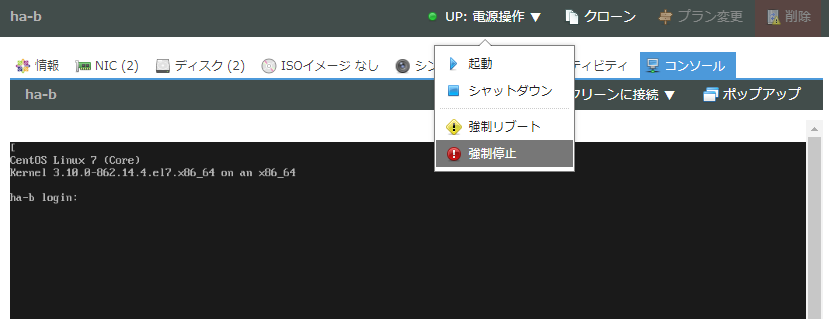
ha-bの強制停止
// ha-bをクラウドのコントロールパネルから強制停止する。
// その後、pcs statusで状態を確認する。
[root@ha-a ~]# pcs status
Cluster name: ha
Stack: corosync
Current DC: ha-a-local.example.com (version 1.1.18-11.el7_5.3-2b07d5c5a9) - partition with quorum
Last updated: Wed Oct  3 12:08:08 2018
Last change: Wed Oct  3 12:04:37 2018 by root via cibadmin on ha-a-local.example.com

2 nodes configured
7 resources configured

Online: [ ha-a-local.example.com ]
OFFLINE: [ ha-b-local.example.com ]  <- ha-bがOFFLINEになっている。

Full list of resources:

 Master/Slave Set: ms_drbd_r0 [drbd_r0]
     Masters: [ ha-a-local.example.com ]
     Stopped: [ ha-b-local.example.com ]
 Resource Group: zabbix              <- ha-aでリソースが起動している。
     fs_mysql   (ocf::heartbeat:Filesystem):    Started ha-a-local.example.com
     mariadb    (systemd:mariadb):      Started ha-a-local.example.com
     VirtualIP  (ocf::heartbeat:IPaddr2):       Started ha-a-local.example.com
     httpd      (systemd:httpd):        Started ha-a-local.example.com
     zabbix-server      (systemd:zabbix-server):        Started ha-a-local.example.com

Daemon Status:
  corosync: active/enabled
  pacemaker: active/enabled
  pcsd: active/enabled
[root@ha-a ~]#
確認ができたらクラウドのコントロールパネルにてha-bを起動し、pcs statusを再び確認しておきます。
プロセスが停止した場合
プロセスが停止した場合の動作を確認してみます。今回はhttpdをkillします。
[root@ha-a ~]# pkill httpd
[root@ha-a ~]# ps axu | grep http[d]
[root@ha-a ~]# pcs status --full
Cluster name: ha
Stack: corosync
Current DC: ha-a-local.example.com (1) (version 1.1.18-11.el7_5.3-2b07d5c5a9) - partition with quorum
Last updated: Tue Oct  2 17:31:15 2018
Last change: Tue Oct  2 17:22:22 2018 by root via cibadmin on ha-a-local.example.com

2 nodes configured
7 resources configured

Online: [ ha-a-local.example.com (1) ha-b-local.example.com (2) ]

Full list of resources:

 Master/Slave Set: ms_drbd_r0 [drbd_r0]
     drbd_r0    (ocf::linbit:drbd):     Master ha-a-local.example.com
     drbd_r0    (ocf::linbit:drbd):     Slave ha-b-local.example.com
     Masters: [ ha-a-local.example.com ]
     Slaves: [ ha-b-local.example.com ]
 Resource Group: zabbix
     drbd1      (ocf::heartbeat:Filesystem):    Started ha-a-local.example.com
     mariadb    (systemd:mariadb):      Started ha-a-local.example.com
     VirtualIP  (ocf::heartbeat:IPaddr2):       Started ha-a-local.example.com
     httpd      (systemd:httpd):        Started ha-a-local.example.com   <- Pacemakerによって改めて起動される。
     zabbix-server      (systemd:zabbix-server):        Started ha-a-local.example.com

Node Attributes:
* Node ha-a-local.example.com (1):
    + master-drbd_r0                    : 10000
* Node ha-b-local.example.com (2):
    + master-drbd_r0                    : 10000

Migration Summary:
* Node ha-a-local.example.com (1):  <- ha-aでhttpdにfail-countが加算される。
   httpd: migration-threshold=1000000 fail-count=1 last-failure='Tue Oct  2 17:27:52 2018'
* Node ha-b-local.example.com (2):

Failed Actions:                     <- ha-aでhttpdが起動していなかった事が示される。
* httpd_monitor_60000 on ha-a-local.example.com 'not running' (7): call=88, status=complete, exitreason='',
    last-rc-change='Tue Oct  2 17:27:52 2018', queued=0ms, exec=0ms


PCSD Status:
  ha-a-local.example.com: Online
  ha-b-local.example.com: Online

Daemon Status:
  corosync: active/enabled
  pacemaker: active/enabled
  pcsd: active/enabled
[root@ha-a ~]#
killされたhttpdがPacemakerによりstartされ、fail-countというカウンターがカウントされます。fail-countがmigration-thresholdに達すると、リソースは他のノードで起動します。今回は制約を設定していますので、原因となるリソース以外も他のノードにフェイルオーバーすることとなります。一度、このfail-countをリセットしておきます。
[root@ha-a ~]# pcs resource cleanup httpd
今度は、migration-thresholdのデフォルト値を変更して、1回でもfail-countがカウントされるとフェイルオーバーするようにしてみます。
// migration-thresholdを変更
[root@ha-a ~]# pcs resource defaults migration-threshold=1
Warning: Defaults do not apply to resources which override them with their own defined values

// httpdをkillして確認してみる
[root@ha-a ~]# pkill httpd
[root@ha-a ~]# ps axu | grep http[d]
[root@ha-a ~]# pcs status --full
Cluster name: ha
Stack: corosync
Current DC: ha-a-local.example.com (1) (version 1.1.18-11.el7_5.3-2b07d5c5a9) - partition with quorum
Last updated: Tue Oct  2 17:34:56 2018
Last change: Tue Oct  2 17:32:53 2018 by root via cibadmin on ha-a-local.example.com

2 nodes configured
7 resources configured

Online: [ ha-a-local.example.com (1) ha-b-local.example.com (2) ]

Full list of resources:

 Master/Slave Set: ms_drbd_r0 [drbd_r0]
     drbd_r0    (ocf::linbit:drbd):     Slave ha-a-local.example.com
     drbd_r0    (ocf::linbit:drbd):     Master ha-b-local.example.com
     Masters: [ ha-b-local.example.com ]
     Slaves: [ ha-a-local.example.com ]
 Resource Group: zabbix
     drbd1      (ocf::heartbeat:Filesystem):    Started ha-b-local.example.com
     mariadb    (systemd:mariadb):      Started ha-b-local.example.com
     VirtualIP  (ocf::heartbeat:IPaddr2):       Started ha-b-local.example.com
     httpd      (systemd:httpd):        Started ha-b-local.example.com                 <- 他のリソースもha-aからha-bにフェイルオーバーしている。
     zabbix-server      (systemd:zabbix-server):        Started ha-b-local.example.com

Node Attributes:
* Node ha-a-local.example.com (1):
    + master-drbd_r0                    : 10000
* Node ha-b-local.example.com (2):
    + master-drbd_r0                    : 10000

Migration Summary:
* Node ha-a-local.example.com (1):
   httpd: migration-threshold=1 fail-count=1 last-failure='Tue Oct  2 17:34:30 2018'  <- fail-countがmigration-thresholdに達している。
* Node ha-b-local.example.com (2):

Failed Actions:
* httpd_monitor_60000 on ha-a-local.example.com 'not running' (7): call=109, status=complete, exitreason='',
    last-rc-change='Tue Oct  2 17:34:30 2018', queued=0ms, exec=0ms


PCSD Status:
  ha-a-local.example.com: Online
  ha-b-local.example.com: Online

Daemon Status:
  corosync: active/enabled
  pacemaker: active/enabled
  pcsd: active/enabled
[root@ha-a ~]#
上記の状態では、ha-aでhttpdのfail-countがmigration-thresholdに達しています。この状態でアクティブなha-bがダウンした場合、ha-aでhttpdとzabbix-serverリソースが起動しなくなってしまいます。そこで、動作が確認できたらcleanupを実行し、fail-countをリセットしましょう。ステータスの確認も忘れずに行ってください。
[root@ha-a ~]# pcs resource cleanup httpd
[root@ha-a ~]# pcs status
最後に
駆け足でしたが、DRBDとPacemakerを用いたHA構成のZabbixサーバ構築をご紹介してきました。最初にお伝えしたとおり、基本的な構成はLAMP環境なので、LAMP環境で動作するCMSも同じ方法で動かすことができます。
しかし、実際に構築と運用を行う際には、注意しなければならない点があります。
例えば、HAを構成するサーバに入っているソフトウェアやライブラリのバージョンが異なっていたり、ソフトウェアの設定ファイルの同期を忘れたりしてしまうと、実際にアクティブなサーバが切り替わっても正常に動作しないこともあります。今回のZabbixサーバであれば、zabbix-serverの設定ファイルをha-aとha-bで同じものにしておかないと、アクティブなサーバが切り替わった時にデータベースに接続できずに監視が停止したり、Zabbixの設定パラメータが異なるためにPollerなどが十分に立ち上がらず監視が停止したりすることになります。またzabbix-serverのバージョンが異なる場合、フェイルオーバーの際にデータベースの自動アップグレードが発生してダウンタイムが長期化したり、データベースバージョン不一致によりzabbix-serverが起動できずに監視が停止したりします。
もちろんですが、単純構成のサーバに比べてDRBDやPacemakerの要素が増えますので、これらのトラブルやオペレーションミスには気をつけなければなりませんし、トラブルが起きた時に短時間でより安全に復旧させるための事前知識も必要となります。例えば今回の構成では、ローカル側のスイッチが停止した場合にホストが互いを認識できない状態となります。結果として互いにアクティブなホストとして動作したり、その影響でDRBDのスプリットブレインという互いにPrimaryロールとして動作する事象が発生したりします。ダウンタイムを短くする目的で導入したDRBDとPacemakerが、事前の準備不足により、逆効果となってしまうかもしれません。
しかし、特に物理サーバでは、ハードウェア故障の際にダウンタイムを短くする非常に有効な手段となります。また、ダウンタイムを短くするという目的はもちろんのことですが、夜中や休日に緊急の電話を受けて対応しなくても済むようになりますので、上記の点には注意したうえで活用することをおすすめします。